Tag Archives: purim

Pina Colada Hamantaschen

Pina Colada Hamantaschen

Pineapple and coconut is one of my favorite flavor combinations, so for my favorite holiday, I combined the two into the perfect pina colada hamantaschen. My favorite hamantaschen of all time are the prune flavor I make with my classic recipe.  Yet, classic hamantaschen are kind of boring lately.  So in the past I shared my recipe for peanut butter jelly hamantaschen that were a huge success!  I had this cookie idea for Purim last year, but I never got around to testing it out.  I’m glad I planned a little early this year, because here it is!

Coconut Hamantaschen with Pineapple Filling

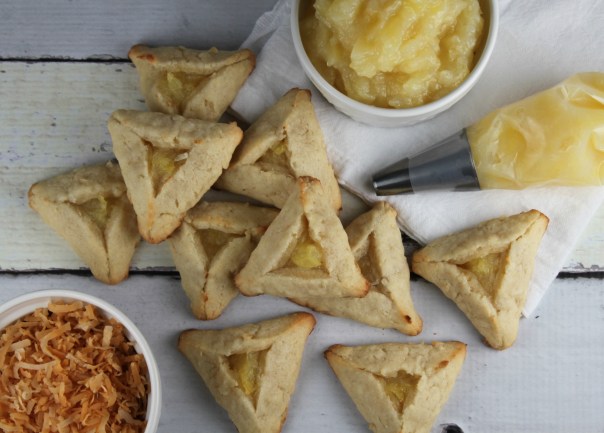
The cookie is crispy, yet tender and soft, and full of coconut flakes.  I added coconut extract for double the flavor and intensity. The homemade pineapple filling is so easy and delicious, you won’t believe it!  I know a classic pina colada cocktail is supposed to contain rum, but I skipped it to keep it simple and kid friendly.  If you are missing it from this recipe, try adding a rum icing over the top of each cookie. Simply mix 1½ cups powdered sugar with 3 tablespoons of rum until smooth.  Then drizzle a little bit of icing over each and enjoy!

Pina Colada Hamantaschen
Author: 
 
Ingredients
Coconut Dough:
  • ½ cup shortening
  • 1 cup sugar
  • 1 tsp. coconut extract (I like the Lorann Coconut Bakery Emulsion)
  • 1 egg
  • 1 egg yolk
  • 2 ½ cups flour
  • 1 cup shredded sweetened coconut, slightly ground
  • ¾ tsp. baking powder
  • ½ tsp. salt
  • 3 Tbs. pineapple juice
Pineapple Filling:
  • 1-20. oz can crushed pineapple with juice
  • ½ cup sugar
  • 3 Tbs. corn starch
  • pinch of salt
Instructions
Prepare the filling:
  1. In a medium pot, combine the canned pineapple with the juice, sugar, cornstarch, and salt. Stir to make sure the sugar and cornstarch are combined. Heat the mixture on medium heat for 3-5 minutes until thickened and clear; no longer cloudy. Make sure to stir frequently so the pineapple doesn’t burn. Remove from heat, cover directly on the surface with plastic wrap so a skin does not form, and chill in the refrigerator until cool, at least 3 hours. Filling makes 2 ½ cups and can be make a few days in advance and stored in the refrigerator.
Prepare the dough:
  1. In the bowl of an electric stand mixer fitted with the paddle attachment, beat the shortening with the sugar and coconut extract until light and fluffy. Add in the egg and egg yolk and mix until combined. Add in the flour, ground coconut, baking powder, and salt and slowly mix on low speed. Pour in the pineapple juice and mix until a dough is formed. You can use the dough right away. If the dough is too sticky, wrap and chill in the refrigerator for a half hour.
Form the hamantaschen:
  1. On a lightly floured surface, or on a floured sheet of parchment paper, roll out a piece of the dough until thin. Use a round cutter (2½ to 3 inch in diameter) and cut out circles of dough. Fill each round with a tsp. of filling and pinch the seams together to form a triangle. Transfer to parchment lined baking sheet and bake in 350 degree oven for 8-10 minutes until the edges begin to brown. Allow to cool and enjoy!

Ice Cream Scoop Cookies

Ice Cream Scoop Cookies on Cones

It is customary on the Jewish holiday of Purim for every family to give a food related gift basket to family and friends.  I always try to be innovative and creative and keep my treats small and sweet.  Last year I made these popcorn cupcakes.  They were so adorable that I didn’t think I would come across a better idea; ever.  Until… I came across this gorgeous treat on Cookie Crazie almost a year ago.  I knew that I had to make these for my Purim treats (shalach manot).  Keeping this idea in my back pocket for so long was a struggle, but I did it!  You don’t have to wait, there is still time for you to make them!  These would also be fun for a children’s birthday party on a dessert table, or as a fun project to do with the kids!

Baking Cake in Ice Cream Cones

I arranged flat bottomed ice cream cones in a mini cupcake pan.  Then I mixed up my favorite vanilla cake batter.  You can also use cake mix.  I filled each cone about halfway up the cone and baked them at 350 degrees F for about 20 minutes.  I baked the cones on the bottom rack of my oven so the cones wouldn’t get too dark.  Once the cones were baked it was on to the ice cream scoop cookies!

First Steps in Forming Ice Cream Scoop Cookies

I mixed up my perfect sugar cookie dough.  You can use my recipe which is ready to use straight from the mixer, there is no chilling required!  Then I used my large cookie scoop (1 1/2 Tbs. size OXO Brand) and filled it with cookie dough.  Then I held it scoop side down on a parchment lined cookie sheet and squeezed the scoop until dough popped out.

Second Step to Forming Ice Cream Scoop Cookies

Next I took my smaller sized cookie scoop (2 tsp. size OXO Brand) and pressed the scoop down into the center of the cookie scoop.  Then, holding the scoop down on the dough, I squeezed the scoop to pop the dough out of the small scoop.  And voila! A perfectly formed cookie dough ice cream scoop!

Different Flavors of Cookie Ice Cream Scoops

My favorite part of this project is coming up with the ice cream “flavors”.  You can definitely keep the cookies simple and elegant and go with vanilla.  The vanilla cookies are cute as is, but adding some rainbow sprinkles to the top before baking makes the cookies super cute!  For some of the scoops, like the mint, I mixed the gel paste in all the way to get a uniform color.  For others, like the blueberry or strawberry, I mixed the color in until it looked marbleized like an ice cream swirl.

Ice Cream Scoop Cookies

Bake the frozen cookies at 350 degrees F for 13 minutes.  If you want to add chocolate chips to the scoops, press chocolate chips into the scoops as soon as they come out of the oven.  This will ensure that the chips keep their shape and don’t melt all over in the oven. Once the cookies are cool, attach them to the cake filled cones using your favorite buttercream frosting or royal icing.  Stack them up for a double or triple scoop!

Wrapped Ice Cream Scoop Cookie Cones

Wrap them up in simple clear treat bags and share them with your sweetest family and friends!

4.0 from 1 reviews
Ice Cream Scoop Cookies on Cones
Author: 
Prep time: 
Cook time: 
Total time: 
Serves: 24
 
Ingredients
  • Flat bottom ice cream cones
  • one recipe of cake mix or favorite cake batter
  • one recipe favorite sugar cookie dough
  • gel food color (optional)
  • sprinkles (optional)
  • chocolate chips (optional)
  • favorite buttercream frosting or royal icing
Instructions
  1. Preheat oven to 350 degrees F.
  2. Arrange ice cream cones in mini baking pan, or on a flat baking sheet.
  3. Prepare cake batter and divide between ice cream cones, filling each about half way.
  4. Bake for about 20 minutes until the cake springs back to the touch or a toothpick comes out clean.
  5. Allow cones to cool.
  6. Prepare sugar cookie dough.
  7. If you like, color the cookie dough desired colors to create ice cream "flavors".
  8. Scoop cookie dough onto parchment lined cookie sheet using a large cookie scoop (1½ Tbs. size).
  9. Next, press a smaller cookie scoop (2 tsp. size) into the center and holding the scoop down, squeeze the cookie scoop until the scoop pops out.
  10. If using sprinkles, now is the time to press them on.
  11. Freeze the scoops for about 1 hour until firm.
  12. Bake for about 13 minutes until the cookies are just baked through.
  13. If using chocolate chips, press them into the scoops as soon as the cookies come out of the oven.
  14. Cool the cookies.
  15. Once the cookies are cool, attach them to the cones using buttercream frosting or royal icing.

Here are some more fun ideas for you from some of my blogging buddies, enjoy!


Popcorn Cupcakes

Popcorn Cupcakes

I keep seeing these cupcakes all over Pinterest.  If you don’t know what Pinterest is, you are missing out!  It’s my favorite new obsession; I don’t know how I ever lived without it. Pinterest is a virtual pinboard; a place to keep all your great internet finds indexed and accessible.  There is no need to bookmark a crafty project or print out every recipe you want to try.  Just pin it to your personalized boards and voila!  It’s right there for you when you need it.  I can spend hours browsing other pinners pins, it’s really addictive.  Don’t say I didn’t warn you.  As I was saying, I have seen these popcorn cupcakes all over Pinterest and I obviously had to pin the idea.  I knew that I would make them at some point in the near future and then Purim came around.  What a perfect opportunity to try these cupcakes!

Marshmallow "Popcorn"

The “popcorn” is actually made from mini marshmallows that I snipped to give them the fluffy air popped look.  The “popcorn” looked good but it was missing something: the butter!  So I pulled out my trusty airbrush and hit them with a shot of yellow and gold food coloring.  My husband actually thought it was real popcorn and told me I was weird for putting it on a cupcake.  Now I wasn’t really going to make these cupcakes until I found the perfect containers at Michael’s Art’s and Craft’s Store.

Popcorn Cupcake Bags

Once I saw these cardboard bags I knew I could fill them with the cutest popcorn cupcakes.  Two regular sized cupcakes stacked on top of one another fit perfectly.  Then the whole bag fit nicely inside tall clear bags I always have on hand.

Popcorn Cupcake Packages

My cute little packages weren’t complete until they had sugar cookie movie ticket tags.

Motorcycle Charlie

Here is Charlie in his cool biker dude costume.  He is a lot bigger than last year, but just as cute!  Happy Purim!