Honey Sugar Cookies {recipe}

Honey Sugar Cookies

A few months ago I ordered an apple shaped cookie cutter.  I might have a cookie cutter addiction by the way.  But that’s not the point here.  I was planning on using the cutter to make apple shaped sugar cookies for Rosh Hashanah (the Jewish New Year).  One of the traditions over the holiday is dipping an apple in honey for a sweet new year.  Then it hit me!  Why not make apple shaped honey cookies!
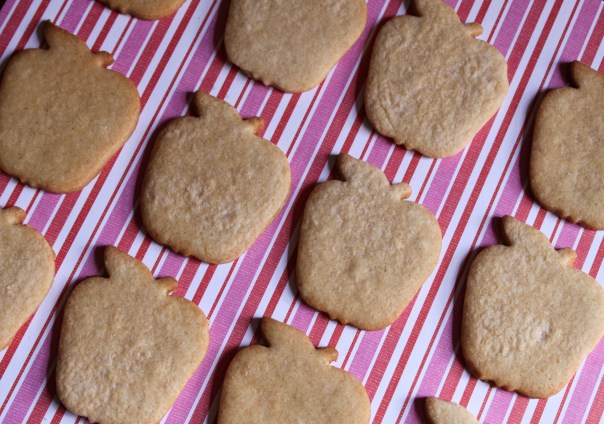
Apple Shaped Honey Cookies

Now don’t get me wrong, I love my classic sugar cookie recipe, I think it’s perfect.  The cookies are delicious fresh out of the oven, but are also great for decorating.  They are sweet and chewy.  But these honey cookies are equally as amazing!  The honey flavor is delicate and not too overwhelming.  The honey sugar cookies are sweet but not too sweet.  They are crispy and chewy all at once.  This is exactly what I look for in a cookie. They also bake beautifully, they puff up nicely but don’t lose their shape.  The dough is also ready to use right after it’s made, no need to chill the dough before using.

Stack of Honey Sugar Cookies

Last year I shared a completely different type of honey cookie.  The recipe I shared last year yields a super sweet, super intense honey flavored cookie.  They are deliciously moist, chewy, and crispy crunchy.  They are no joke.  But if you are looking for a hint of honey, a nice delicate cookie, try these honey sugar cookies!  You won’t be sorry!

Row of Honey Sugar Cookies

Here is the non-dairy, printable recipe I adapted from Yammie’s Noshery.  For more delicious honey inspired recipes, check out the link party some friends and I are having! It’s located right below my recipe card.

Honey Sugar Cookies
 
Ingredients
  • 1 cup vegetable shortening
  • ¾ cup sugar
  • ¼ cup honey
  • 1 Tbs. vanilla bean paste (optional)
  • 1 tsp. vanilla extract
  • 1 egg
  • 1 egg yolk
  • 3 cups flour
  • 2 tsp. baking powder
  • 1½ tsp. cornstarch
  • ½ tsp. salt
Instructions
  1. Preheat the oven to 350 degrees F.
  2. Line sheet pan with parchment paper.
  3. In the bowl of an electric stand mixer fitted with the paddle attachment, beat the shortening, sugar, honey, and vanilla paste and extract until light and fluffy.
  4. Add in the egg and egg yolk and mix until incorporated.
  5. In a separate bowl mix the flour, baking powder, cornstarch, and salt together.
  6. Add it to the mixer and carefully mix until the dough comes together.
  7. Instead of using flour, use confectioners sugar to roll out the dough. Roll the dough out thinly and cut out shapes using your favorite cookie cutter. Transfer shapes to parchment lined baking sheet and bake for 7-9 minutes until the edges are lightly brown. Allow to cool completely before enjoying! *These cookies freeze well.

Hummus Platter Cake

Hummus Platter Cake

For Moishy’s 31st birthday, he got a cake featuring his favorite foods!  The platter included a bowl of hummus, some slices of pita, a sliced avocado and some lemons.  This is my first themed food cake and was really fun to create!  The plate and the bowl are even edible. The whole platter is sitting atop an 8 inch cake that I covered in white fondant and airbrushed silver.

Fondant avocado, lemons, and pita

Here’s a closer look.  To make the plate, I rolled out a large piece of white gum paste.  (I like using gum paste because it hardens more than fondant, making it more sturdy for a cake like this).  I dusted one of my fancy dinner plates with tons of cornstarch, so the gum paste would release easily, and placed the gum paste on top.  Then I trimmed the gum paste to the same size as the plate and let that dry for a few days.  I did the same thing for the silver bowl.  I used one of my small serving bowls as a mold, flipped it over and dusted it with a whole bunch of cornstarch.  I then draped a thin piece of gum over the bowl, trimmed it down (so it wouldn’t be too deep) and left it to dry out for a few days.  Once dry, I airbrushed the bowl in silver.

Fondant AvocadosNow I wouldn’t recommend biting into one of these avocados; they are made completely out of fondant.  But they look pretty authentic!  I used some light green fondant and formed it into an avocado shape and then sliced it in half.  I scooped out a little circle for the pit to fit and I left it to dry cut side down for a few days.  Meanwhile I mixed some leaf green and black gel food color with vodka and pained it on the outside.  After a few days, I flipped the avocado, cut side up and worked on the inside.  I mixed some leaf green gel color with vodka and brushed it around the edges, trying to blend it lighter towards the center.  Then I formed a pit out of fondant and painted it with brown gel paste thinned with vodka.  I attached it with a little royal icing.

Lemon Slices Made of Fondant

I also made the lemons out of fondant.  I shaped two pieces of white fondant into lemon slice shape.  I scored the inside with a pointed gum paste tool, but you can also use a toothpick.  I also poked holes around the top to replicate the lemon peel.  To color the lemon I used lemon yellow gel color (how appropriate!) thinned with vodka and painted the peel and the sections, leaving some white spaces to replicate the pith.  To make it shine I brushed on a mixture of corn syrup and vodka.  It’s hard to tell in the picture, but the lemon is shiny!

Fondant Pita Chips

To make the pita chips, I tinted some ivory fondant and rolled it out thinly.  Then I folded it in half (making sure to dust it with confectioners sugar or cornstarch so it wouldn’t stick together) and cut out a “v” shape starting at the folded edge.  Then I crumpled the top of the pita wedge to make it look baked and puffy.  Once they were allowed to dry for a few days, I airbrushed the pita slices with some brown and orange airbrush color.  The pita is my favorite part-don’t tell the rest of the cake!

Frosting Hummus

The hummus was the easiest part of the cake.  I tinted some thick frosting with ivory gel paste and piped it into the bowl.  The I sprinkled some paprika on top (what…it’s edible!) and cut some green fondant to look like parsley.  Once everything was arranged on the plate, the cake really came together.  This cake took a lot of preparation, but I couldn’t be happier with the results!

Grilled Peach Hand Pies

Grilled Peach Hand Pies

We are having a virtual BBQ!  What I mean is that some Kosher food blogger friends and I are all sharing some delicious grilled recipes to celebrate the last bit of summer.  Most of the other recipes will be main courses, but I’m a crazy cake lady and had to challenge myself to come up with a grilled dessert.  Now I could have grilled some pineapple, served it over some homemade coconut sorbet, and called it a day.  But that was too simple.

Grilled PeachesWhen I couldn’t think up any other exciting ways to use grilled pineapple, I started thinking about grilling other fruit.  First I thought I would grill some peaches and use them in a pie.  Grilled peach pie filling; cute idea, but not cute enough.  What if I form individual pies and then grill the pies themselves…double grilled peach hand pies; bingo!

Grilled Hand Pies

First, mix up some pie dough and allow to chill for at least an hour.  Preheat your grill or indoor grill pan.  Then work on the filling.  Peel and slice the peaches.  Then grill the peaches.  Once grilled, dice them up, toss with flour, sugar, cinnamon, and a splash of bourbon.  Now roll out the chilled pie dough, use a large round cutter (mine was 3 1/2 inches in diameter) and cut out circles.  Fill the pie circles with a tablespoon of peach filling, brush water around the edge and carefully fold the circle in half.  Seal the seam with your fingers or with a fork.  Chill the pies for 15-30 minutes and then grill!  I grilled mine on an indoor grill pan for about 3 minutes per side.  The grill pan was extremely hot so the dough didn’t get fully baked.  If you are using a grill pan I recommend finishing them off in the oven.  Immediately transfer the pies to a baking sheet and place in a 350 degree oven for 5-10 minutes until golden brown.

Glazed Peach Hand Pies

They can be served like that, but I like my pies glazed.  Apparently, grilled pies are not my original idea (oh well), but I didn’t see anyone glaze their pies after grilling (points for originality).  Thin out some confectioners sugar with cold water and brush on the warm pies.  Now enjoy!  These pies are sweet and savory; the dough is flaky but not too light. The grill really adds another layer of depth and flavor; what a great way to finish off any delicious barbecue.  Why shut off your grill once the burgers and hot dogs are ready?  Grill dessert too and be sure to check out the rest of the virtual BBQ at the bottom of this post!

Grilled Peach Hand Pies
Serves: 12
 
Ingredients
Pie Dough
  • 2 cups flour
  • ½ cup shortening
  • 2 tsp. margarine
  • 1 tsp. salt
  • ¼-1/2 cup ice cold water
Peach Filling
  • 2 large peaches, peeled and cut into chunks
  • ⅛ cup flour
  • ⅛ cup sugar
  • ½ tsp. vanilla extract
  • ½ tsp. cinnamon
  • ½ tsp. bourbon (optional, but recommended)
Glaze
  • 1 cup confectioners sugar
  • 3-5 tsp. water
Instructions
Pie Dough
  1. In the bowl of an electric stand mixer fitted with the paddle attachment mix the flour, shortening, margarine, and salt until sandy.
  2. Slowly stream in the cold water until a dough begins to form.
  3. Divide the dough in half and wrap each half in plastic wrap.
  4. Chill until firm, about one hour.
Peach Filling
  1. Peel and cut the peaches into large chunks.
  2. Grill each piece for about 3 minutes per side.
  3. Dice the peaches into small pieces (they need to fit into individual pies.
  4. Toss the grilled peaches with the flour, sugar, cinnamon, and bourbon.
  5. Roll out one half of the chilled pie dough on a floured surface.
  6. Using a large circle cutter (at least 3½ inches) cut out 4 circles.
  7. Fill each circle with 1 Tbs. of the peach filling.
  8. Brush a little water around the edge of the circle, fold the dough over the filling and seal the seam with your fingers.
  9. Repeat with the other half of the dough.
  10. Use the dough scraps to cut 4 more circles and fill.
  11. Chill the formed pies for 15-30 minutes. Meanwhile heat up the grill or grill pan.
  12. Grill the pies for 3 minutes per side.
  13. If using a grill pan, bake the pies at 350 degrees F immediately after grilling for 5-10 minutes until golden brown.
Glaze
  1. While the pies are cooling, mix the confectioners sugar with the water until thin.
  2. Brush the glaze on each pie and enjoy!