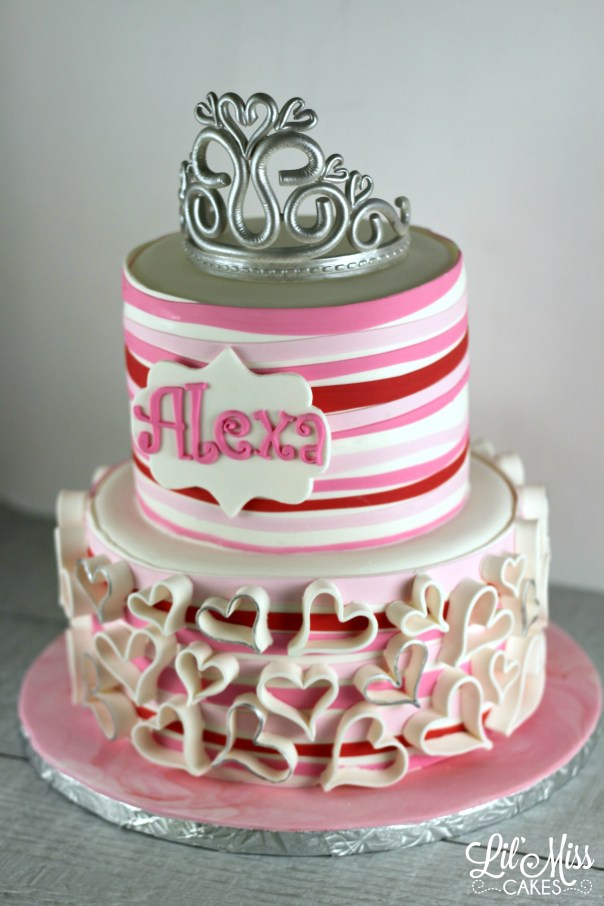
I am a bit behind on sharing my cakes with you, but I like to put time and effort into everything I share. I also get distracted very easily and often come up with a string of recipes to share. This cake is from May and I made it for my daughters first birthday. Since she is too young to ask for a specific theme, I get to experiment. The cake still needs to be fabulous because my family is expecting something great! I was inspired by this cake by Allison Kelleher of AK Cake Design. It was a total experiment since I have never done anything like this before and although I like how it came out, I have a few changes that I would make next time. I originally covered each tier in fondant and then added the ribbon stripes by wrapping them around the cake. Next time I would wrap the fondant directly on the buttercream kind of like paneling the cake. That would give me a sharper edge and less bulk. It would also save on fondant which is $$.
I had this idea of adding 3D hearts all around the bottom tier to cover up the stripes a bit and add a peekaboo effect. I rolled out some fondant pretty thin and cut strips out. Then I formed some fun and funky heart shapes and allowed them to firm up a bit on a sheet pan. Then I attached them to the cake with some royal icing, but I think next time I would use piping gel or sugar glue. Another change I would make would be making even thinner hearts, these seem a bit too chunky for me-I like light and dainty designs. After attaching all the hearts in a random fashion, I painted some of the edges in silver just to tie in the gum paste tiara cake topper.
Making the stripes is not too difficult, but I did end up with tons of multi color scraps. So I kneaded them all together and created this marbled cake board. Overall I am happy with this cake, but I would love to try it again! Maybe even with some different colors. My little Alexa was happy with it too!
I am freaking out over these cookies right now! I know that rainbow desserts are sort of trending right now, and I wanted to come up with my own version. I wanted my dessert to be rainbow colored but elegant and easy to do. I did not want to separate batter into 6 different bowls to mix up each color of the rainbow. I didn’t want to bake 6 different cakes, or knead challah dough into 6 different colors and then braid the rainbow. I’ve seen people dye cookie dough into rainbow colors but something about that looks like play-dough to me and I just couldn’t do it! These tender cookies are my cute and simple rainbow treat. They are not too sweet and the texture is perfect for eating with tea or coffee. Kids will devour these, because of the fun colors and the rainbow sprinkles! The sprinkles are definitely optional but I love the added color and texture they bring to these cookies. This was my very first try making these cookies, I may add a bit more gel food coloring next time. I may also add a dot of white icing in the center to make them look like more of that traditional bakery style cookie. I love how easily these can be customized, you could mix and match the colors of the food gel and the sprinkles to match any party theme or occasion. I took a bunch of progress photos to show you how I made these, They aren’t the best but I hope they will be clear-please ask if you have any questions on the process!
Mix your cookie dough (recipe at the end of the post). Roll out your dough or since it’s soft, press it out flat and square onto a piece of parchment or wax paper. Mine is about 11×11 inches. Using gel food coloring (I use Americolor brand) take a food only paintbrush and paint vertical lines of each color you want to include. I painted about 1 inch lines of red, orange, yellow, green, blue, and purple. I left spaces in between each color so I wouldn’t get any blending but next time I may paint each color up until the next color to get some blending. I cleaned my brush of in between painting each color.
Lift up your parchment or wax paper and fold the cookie dough over 1/3 of the way making sure to match up your colors, (You want your red folding down on the red, orange on orange…)
Peel the parchment or wax paper back onto your work surface.
Lift your paper and fold the bottom of the dough over 1/3 of the way to close up your dough and seal the food coloring inside.
Again, peel back your paper.
Dust your cookie dough with flour or powdered sugar and roll it out with a rolling pin.
You only want to roll out the dough in one direction, in the same direction that your vertical stripes are going, towards you and away from you. Do not widen it by rolling it left to right. Try to roll it to about 12×12 inches. At this point, I folded the dough the same way as before: from top to middle about 1/3 of the way down matching your vertical stripes, and then bottom up to form a rectangle. I then rolled it out the same way, towards and away, not left to right.
Now rotate your dough 90 degrees by turning your whole piece of paper. The colored lines should now be horizontal. Lift your dough from the bottom by lifting your paper (I started from the purple color) start rolling your dough into a log.
Keep lifting the paper to allow it to roll up making sure to peel the paper away.
Once your dough is rolled up, divide it into 3 equal pieces (or as equal as you can get it-no need to measure). Cutting will make the dough easier to handle.
Once you divided your dough, you will be able to see the cool swirly effect! Take each log and lengthen/ thin it by rolling it to about 8 inches long. You may feel some air inside the log. That’s okay, just squeeze the dough a bit to remove those pockets and continue to roll into a smooth tight log.
This part is optional, but I couldn’t skip the rainbow sprinkles! Spread out some rainbow sprinkles and then roll your dough in the sprinkles. You can leave the ends bare since they will get sliced off anyway.
Once your dough is covered in sprinkles, tightly roll it up in wax or parchment paper and chill it in the freezer for at least 1/2 hour. (At this point you could store it in the freezer for up to 3 months, I would just store it in a freezer ziplock bag. Just slice and bake when needed).
After your dough is chilled it will be easier to slice. Using a serrated knife, slice your cookies about 1/2 inch wide. You should get 12-15 cookies from each of your 3 logs.
Arrange your cookies cut side up on a parchment lined cookie sheet and bake at 350 degrees F for 10-12 minutes. You don’t really want to see any browning, you just want the cookies to look dry on top. If you brown them too much they may not be tender.
You did it! Hope you enjoy making these impressive cookies. They really are easy to make-I can’t wait to see your cookie designs! Here’s my easy dairy-free recipe.
I guess you can say that this is my most popular cake right now. It totally makes sense though, look how cute it is! Kids love it because of all the transportation included; moms love it because it’s sweet and young and whimsical. Win-win! So this is my second version of this cake. The original had larger cars and trains. I made them smaller to fit more around the cake. I also designed some cloud cutters, car cutters, and a train cutter to speed up the decorating process. You can also purchase the cutters to make this airplane topper. Once you have the cutters, check out my tutorial for putting it all together. Stay tuned for my two tier version of this cake!