Category Archives: Cookies

Personalized Heart Cookies

These cookies have been all the rage at engagement parties.  I have attempted to make them before but was never happy with the results.  Recently though, I found a royal icing recipe that I loved.  So when I was asked to make these cookies I was more than willing to redeem myself.  I am so pleased with how these black and white personalized cookies turned out!

Monogram Cookie

Here is how I made these.  I baked up my favorite sugar cookies and then iced them in white royal icing.  I love how smooth the royal icing looks.  Once the royal icing was dry and hard I stenciled on the bride and grooms initials.  Holding the stencil in place, I dipped a clean paintbrush (only used for food) into black gel food color.  I like using Americolor super black.  Before applying the gel color to the cookie, I like to dab some of the excess color onto a paper towel.  If there is too much gel color, it starts to bleed out.  Then using a good amount of pressure, I dabbed the food coloring onto the stencil.

Black and White Monogram CookiesNext, each cookie got a black royal icing border.  I used a number 2 straight tip fitted in a disposable piping bag to pipe the tiny shell border.  Finally, each cookie was decorated with a black fondant flower.  Each flower was attached with more white royal icing.

Personalized CookiesThe black and white color scheme give these cookies an elegant look, but they can be made in any color to match any party decor.  Order some for your next occasion!  Contact me for details.

I love making cookies, but sometimes my son Charlie isn’t so happy when he is being ignored.  He hates being locked out of the kitchen.

Charlie locked out

Look at his sad face…it’s too cute to ignore!

Charlie Cute

Don’t worry baby…mommy’s done!  Time to play!

Monogram Cookies

purple monogram cookies

These cookies are super cute and really easy to make.  They require a little preparation but they are worth it!  Here’s how it’s done.  I found a cute font on Microsoft Word and printed out a whole sheet of the letter “D”.  Then I whipped up a batch of royal icing.  I placed a sheet of parchment paper on top of the computer printout.  Using white royal icing, I carefully piped each “D” and immediately sprinkled with white nonpareils.  These letters need to dry for at least 24 hours.

Square Monogram Cookies

While the letters are drying, mix up a batch of your favorite sugar cookies and bake.  Color some royal icing; I made a light and dark purple.  Once the letters are dry, use a palate knife or offset spatula to carefully release the letters from the parchment paper.  Get ready to ice!  Working one at a time, pipe purple royal icing onto each cookie and immediately drop a letter into the center of the cookie.  Quickly pipe white polka dots around the cookie.  Allow the cookies to dry for at least 24 hours.  I love the 3D effect of these cookies and can’t wait to make them again…Order them for your next occasion!


Chocolate Crinkle Cookies

Non-Dairy Chocolate Crinkle Cookies

When my friend Andrea needed a better recipe for chocolate crinkle cookies, she asked me for mine.  I was almost embarrassed to tell her that I had never made them before!  The recipe she has is great but it’s messy; the dough is too sticky and is hard to work with.  I asked her for the recipe so I could try it for myself.  The original recipe comes from Kosher by Design Short on Time cookbook.  The recipe is non-dairy and calls for oil instead of butter.  I realized that the oil is causing the cookie dough to be too sticky so I replaced the oil with vegetable shortening and was so happy that I did!  The dough was perfect, no need to refrigerate it before working with it.

naked chocolate crinkle cookies

I don’t like recipes that require “thinking ahead”…who has time?  This dough gets mixed together and it’s ready to go.  Using a cookie scoop, measure out the dough and roll it into a perfect ball.  Then roll it in granulated sugar.

chocolate crinkle dough in granulated sugar

Once it is completely coated, roll it in confectioners sugar.

chocolate crinkle in confectioners sugar

Shake off the excess sugar.

shake shake

It looks good enough to eat already!  Hold yourself back-it’s worth it.  Line the cookies up on a parchment lined cookie sheet and bake at 350°F for 8-10 minutes until they are cracked and puffy.

chocolate crinkle cookies fresh from the oven

Allow the cookies to cool for a few minutes on the cookie sheet; they are too soft to transfer to a cooling rack.  You can also slide the whole sheet of parchment paper onto a cooling rack.  Let them cool completely before sampling these gems.

cooling cookies

Rolling the dough in granulated sugar helps the confectioners sugar stick better and keeps it from melting, giving the cookie this great look.  The black and white contrast is gorgeous.

chocolate crinkle cookies all in a row

They look so perfect and professional and are so easy to make!  Pile them up and serve them to your friends and family.

stacked chocolate crinkle cookies

These cookies freeze really well.  I like to eat them straight from the ice box!

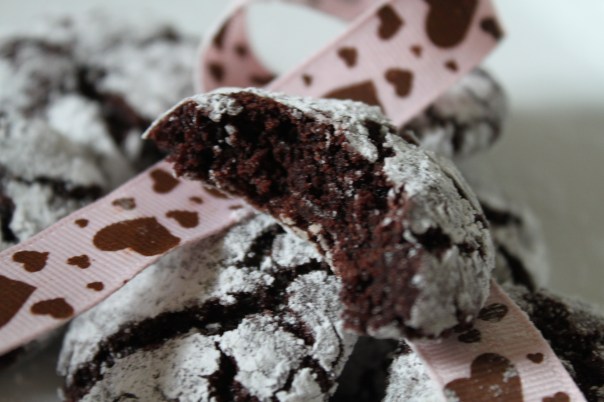
fudgy biteLook how fudgy they are.  Yum!  My son Charlie couldn’t get his tiny hands on a cookie, but he did get a hold of this cute ribbon…

Charlie playing with ribbonWill you try this recipe?  It’s non-dairy, easy and delicious!

Chocolate Crinkle Cookies
Serves: About 5 Dozen
 
Ingredients
  • ½ cup vegetable shortening
  • 2 cups sugar
  • 4 eggs
  • 1 tsp vanilla extract
  • 2 cups flour
  • 1 cup Dutch process cocoa powder
  • 2 tsp baking powder
  • ¼ tsp salt
  • ¼ cup granulated sugar
  • ½ cup confectioners sugar
Instructions
  1. Preheat oven to 350°F.
  2. Line 2 cookie sheets with parchment paper or wax paper and set aside.
  3. In a medium size bowl sift the flour, cocoa, baking powder and salt together and set aside.
  4. In the bowl of an electric stand mixer with the paddle attachment, add the shortening and sugar and mix.
  5. Add the eggs in one at a time and beat until combined.
  6. Add in the vanilla.
  7. Carefully add in the dry ingredients and with the mixer on low speed, mix until combined.
  8. Prepare the sugars. Fill one small bowl with ¼ cup granualted sugar and another small bowl with ½ cup confectioners sugar.
  9. Using a small cookie scoop, scoop the dough and roll into 1 inch balls.
  10. Then roll each ball first in the granulated sugar and then in the confectioners sugar. Make sure to shake off any excess.
  11. Place the dough on the parchment lined cookie sheet and bake for 8-10 minutes until tops are cracked. Allow to cool completely before transferring.