Category Archives: Celebration Cakes

Princess Sequin Cake

Princess Sequin Cake | Lil Miss Cakes

This is what happens when you ask for a girly, princess, one year old birthday cake.  I go over the top!  I decided to try out two new techniques on one cake, the pleating and the gold sequins.

Pink Fondant Pleats | Lil Miss Cakes

These fondant pleats were not so hard to do, they just took a lot of time and a lot of fondant!  This cake was so heavy because all the fondant is doubled over.  With all that fondant, I’m glad the cake looks light and elegant.

Gold Fondant Sequins | Lil Miss Cakes

The gold sequins gave me a few mini heart attacks.  I had this idea and it needed to  happen!  Here is how I made the fondant sequins.

Cutting Fondant Sequins |  Lil Miss Cakes

I mixed white fondant with some tylose powder so it would dry quicker and harder.  Then I mixed in yellow gel color.  I used Americolor lemon yellow and egg yellow.  The fondant needs to be a yellow base because then you need less gold airbrush color.  If you start with white and then airbrush gold color it will take a lot of layers of airbrush color and you may never even achieve the color you are going for.  I rolled out the fondant really thinly (I used my pasta machine attachment, but you could do this without one).  Then I used a small straight round piping tip to cut out lots of tiny circles.  I used a tiny ball tool to pop the sequins out of the tip.

Lots Of Fondant Sequins | Lil Miss Cakes

I cut lots and lots and lots of sequins.  Then I spread them on a parchment lined baking sheet to dry and harden.  The last picture with all the sequins looks a bit lighter in color because it actually is a lighter shade of yellow!  I cut out two different colors of yellow fondant thinking it might give a little more dimension to the finished cake but in the end, it didn’t matter.  Once the sequins dried for a few days, I attached them to a fondant covered cake tier.  I used sugar glue (tylose powder dissolved in water).  I brushed the sugar glue all over the cake and then pressed the sequins on to the cake.  I did this process a few times to get the coverage I needed.  Here is where the heart attacks came in.  I was nervous that the sequins were not going to stay glue on to the cake especially when I tried to add a second layer of sequins.  Then I feared I would run out of sequins!  I ended up with enough, but not by much…always make more sequins then you think you need!  Once the sequins were all attached, I let it dry for a while before airbrushing it with gold airbrush color.  I allowed that to dry before assembling the cake.

Gold Fondant Tiara | Lil Miss Cakes

The tiara was the easiest part of the cake for me this time since I’ve made it before.  This time it gave me a little trouble; the weather was so incredibly humid that the tiara was not drying out!  I broke it a bit when I was attaching it to the cake, but I was able to repair it (phew).  This cake came out so so pretty and I can’t wait to use my new techniques again!

Pink and Gold Sequin Cake | Lil Miss Cakes

Peppa Pig Birthday Cake

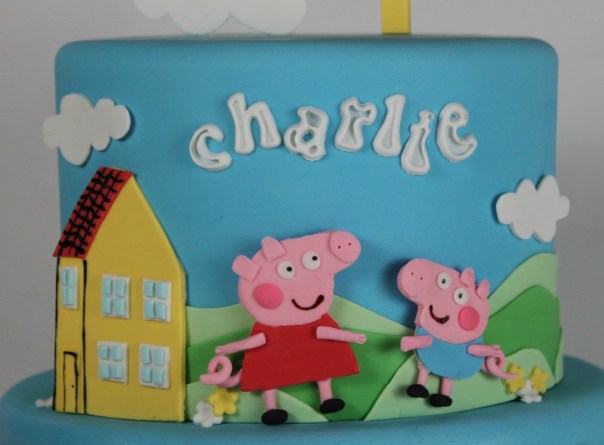
Peppa Pig Cake: Lil Miss Cakes

Peppa Pig is an extremely popular kids show right now.  When I asked my son what kind of cake he wanted, Peppa Pig was it.  For his 4th birthday we invited all his friends!  This was his first real party; in the past we have celebrated with family only.  I made him an amazing Hungry Caterpillar cake for his 2nd birthday and then kinda skipped his 3rd birthday (I feel terrible)!  There was so much going on, his birthday fell out smack in the middle of the High Holidays and I just couldn’t get my act together.  That was not going to happen this year…Charlie got the best cake!Mummy Pig and Daddy Pig

I created Mummy Pig and Daddy Pig for the bottom tier.  I cut out different shades of green to make the hills.  I love the little tiny flowers that dot the bottom of each tier.Peppa Pig and George Pig

I made Peppa Pig, George Pig, and the family home out of gum paste.  The fluffy white clouds were allowed to dry beforehand so they would pop out of the cake a bit.  I used some groovy letter cut outs for Charlie’s name.Fondant Sun and Cloud Cake Topper

For the cake topper I cut a sun and cloud.  I used a large yellow circle for the center of the sun.  I cut thick yellow strips for the rays.  I made sure that the strips were wide enough to hide the lollipop stick support.  The cloud was on it’s own stick.Blowing Out The Candles

Charlie loved his cake and so did all his friends!  Charlie Enjoying His Cake

Happy 4th Birthday Charlie!

Planes, Trains, and Automobiles Cake

Planes Trains and Automobiles Cake

I am in so much love with this cake.  It is so simple yet super cute!  This cake was really easy to make since I was able to prep all the cars, trains and airplane topper in advance.  I really wanted to print some cutters for all the shapes, but it didn’t work out in time.  Instead I drew templates for each design, cut them out of paper, and traced them out of thinly rolled fondant.  I like adding a little tylose powder to my fondant decorations to help them harden really nicely.Fondant train cut outs

Here is a closer look at the choo-choo train that I cut out of fondant.  I let the pieces dry in advance so that they are popping out of the cake just a touch.  It gives the cake a bit of a 3D look which adds interest.  I used different sized piping tips to create all the round circles of the wheels and the steam.  I use both sides of the round piping tips, this gives me so much variety!Cute Fondant Cars

I love these little cars so I made them drive all the way around the cake.  I need to make a cutter for these since I know I will want to make them again! Airplane Fondant Cake Topper

The plane scene on the top of the cake really brings the cake to life!  It’s only a single tier cake but it has amazing presentation because the airplane, clouds, and birthday banner are just filling up the empty space on top.  I attached the plane to one lollipop stick and the banner to a second stick.  I arranged them so they look like they are attached to each other, but keeping them separate was safer for transport.  I added hand cut clouds to the bottoms of the sticks to hide the sticks as well as make the plane appear to be flying over the clouds. Happy 1st Birthday Benji!

Update: This cake has been so popular! See my second version here. The second version includes all the cutter information so you can make your own! Here is the two tier version with more cutter information for you.